Skip to content

Concrete slab patios have become one of the most popular upgrades for CT homeowners, and for good reason, they’re durable, low maintenance, and perfect for creating a clean, functional outdoor space that works year round. With Connecticut’s freeze thaw climate and growing demand for long lasting backyard improvements, more homeowners are choosing concrete over wood decks or pavers.
Understanding how to build a concrete slab patio, what the process involves, and when to hire a professional helps you make confident, cost effective decisions that will keep your patio strong and beautiful for decades.
A concrete slab patio is one of those home improvements that quietly transforms how you enjoy your backyard. Maybe you’ve been thinking about creating a place to relax after work, host weekend cookouts, or set up a low maintenance outdoor dining area. Whatever the vision, a well-built concrete patio provides a clean, stable, long lasting foundation for a range of outdoor living spaces.
Before you get started, it helps to understand what a concrete slab is, how the installation process works, and what to expect especially if you’re deciding between DIY and hiring a professional. Below, we break down the steps, challenges, and benefits in a clear, simple way so you can confidently plan your project and make the best decision for your home.
What Is a Concrete Slab Patio?
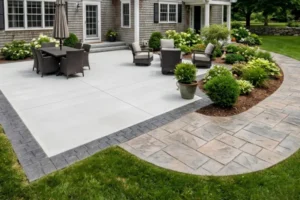
This structure works as a solid surface made by pouring concrete into a framed area. It offers long-term durability, requires minimal upkeep, and can be customized with a range of finishes, textures, and colors. Because of its strength, it supports outdoor furniture, grills, and high foot traffic with ease. In CT’s freeze thaw climate, a properly built concrete slab stands up exceptionally well when installed with the right thickness and drainage.

Cost Factors for Building a Concrete Slab Patio in CT
Your final cost depends on several factors:
- Size: Larger patios require more materials and labor.
- Thickness: Thicker slabs cost more but offer greater resistance.
- Finish Options: Stamped or colored concrete increases price.
- Site Conditions: Poor drainage or rocky soil may require extra prep.
- Labor: Rates vary by location and project complexity.
Recommended Concrete Slab Thickness for Patios
For most Connecticut homes, a minimum thickness of 4 inches works well. Areas meant for heavy grills, hot tubs, or frequent entertaining may require thicker sections. Soil type, drainage conditions, and freeze thaw cycles should all be considered when determining thickness.
Pros and Cons of a Concrete Slab
On one hand, you’ll enjoy strength and low maintenance, providing a sturdy foundation for outdoor gatherings. However, be mindful of potential downsides such as cracking and heat retention, which can affect your outdoor experience.
Benefits
A well built concrete paving slab provides:
- Durability: With the correct slab thickness, it resists cracking and supports long term use.
- Low Maintenance: Occasional cleaning and resealing are usually all it needs.
- Design Flexibility: You can choose from smooth, stamped, exposed aggregate, colored, or stained finishes.
- Weather Resistance: Concrete performs well in the varied weather conditions Connecticut experiences.
Limitations
While concrete is reliable, it’s not perfect. Cracking can occur if it’s not poured correctly or if the soil beneath settles. Extreme heat can warm the surface in summer, and design options are more limited than with pavers. When unsure which option best fits your property, speaking with a concrete patio contractor in CT helps avoid long term issues.
How to Build a Concrete Backyard Patio Slab (Step by Step Guide)
Creating a long lasting concrete outdoor space requires careful planning, proper preparation, and precise execution. Below is an accessible breakdown of how to build a concrete slab patio properly.
Step 1 – Plan the Patio Layout
Start by measuring your available space and visualizing how the patio will function. Consider sun exposure, furniture placement, grilling areas, and walkways. Mark the layout using stakes and string, ensuring the perimeter is square and the elevation is appropriate. Good planning helps prevent drainage issues and ensures your patio blends seamlessly with your yard.
Step 2 – Prepare the Ground
Ground preparation is one of the most critical steps in the entire project. Remove grass, roots, and loose soil, digging down 4–6 inches depending on your desired thickness and gravel base. Compact the soil thoroughly to prevent future settling. In CT, where freeze thaw cycles are typical, proper grading is essential slope the base slightly away from your home to keep water from pooling near the foundation.
Step 3 – Build the Forms
Using sturdy 2×4 lumber, build forms that outline the exact shape of your patio. Secure them with stakes driven into the ground, and make sure the entire structure is level and reinforced. The height of the forms determines the final concrete thickness required for patio durability, so double check measurements before proceeding. The forms hold the concrete in place and provide clean, straight edges.
Step 4 – Choose the Right Concrete Mix
Concrete mix selection affects both performance and appearance. A standard 3,000–4,000 psi mix is ideal for patios, providing sufficient strength for both foot traffic and outdoor furniture. You may choose additives to improve workability or provide freeze thaw protection. Homeowners adding color or decorative finishes should select mixes designed explicitly for staining or stamping.
Step 5 – Pour and Level the Concrete
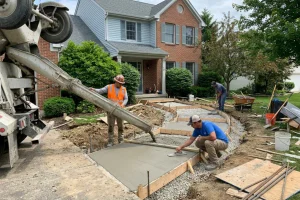
After mixing the concrete, begin pouring it into the formwork, starting at the far corner and working consistently across the space. Use a screed board to level the concrete, pulling it across the forms to remove excess material. Smooth the surface with a bull float to eliminate low spots and encourage even settling. Accurate leveling at this stage determines the final look and prevents water pooling.
Step 6 – Finishing and Curing
Once the concrete is level, use hand tools to refine edges and apply your chosen finish. A broom finish provides slip resistance, while stamped patterns add texture. Cover the slab with plastic sheeting or use a curing compound to help the concrete retain moisture. Proper curing about 7 days for basic use and 28 days for full strength prevents cracking and ensures long-term durability.
DIY vs. Hiring a Professional Concrete Contractor
Building a concrete slab for your patio can be rewarding, but it’s a demanding project.
DIY challenges often include:
- Incorrect grading.
- Uneven surfaces or poor leveling.
- Cracking from improper curing.
- Using the wrong concrete mix.
- Inconsistent slab thickness.
Hiring a professional concrete patio contractor in CT ensures proper drainage, correct installation, and a smooth finish. Pros also handle permits, equipment, and weather related considerations. If long term stability and appearance are most important, professional installation usually offers better value.
Final Tips for a Long Lasting Concrete Patio

Once your new patio is in place, a little routine care goes a long way. Try sealing the surface every 2-3 years to guard against moisture and stains, and give it a quick sweep now and then to prevent debris buildup. If you notice small cracks, addressing them early helps prevent larger issues down the road. And when it’s time for a deeper clean, a gentle pressure wash will keep everything looking fresh.
With proper maintenance, your concrete backyard patio slab can remain strong, beautiful, and ready for your backyard plans for decades to come.
Ready to build your concrete slab patio? Contact our expert concrete contractors in CT for a fast quote and professional installation.
Frequently Asked Questions
1. What tools are necessary for building a concrete backyard patio slab?
You’ll need excavation tools such as shovels, picks, and a wheelbarrow to move soil. A level and measuring tape ensure accuracy, while a tamper compacts the ground to prevent settling. For concrete work, use a mixer or wheelbarrow for mixing, a screed board to level the surface, and trowels or floats for finishing. Safety gear, such as gloves and goggles, is essential for protection.
2. How long does concrete take to cure completely?
Concrete begins to harden within hours, but typically takes 28 days to cure fully. During the first 7 days, keeping the slab moist helps prevent surface cracking. Avoid placing heavy furniture or equipment on the patio until it is sufficiently strong. Proper curing is one of the most critical factors in achieving a long lasting patio.
3. Can I add color or patterns to my concrete patio?
Yes. Integral color can be mixed directly into the concrete for a uniform look, or stains and dyes can be applied after curing for stronger or more vibrant effects. Stamped patterns mimic materials such as brick, stone, or wood, while stencils create geometric or decorative designs. These finishing options personalize your patio without compromising durability.
4. What is the best time of year to pour concrete in CT?
The ideal time is late spring through early fall, when temperatures range from 50°F to 90°F. Extremely hot or cold weather affects curing and strength. Choose a day with mild temperatures and no rain in the forecast. Connecticut’s freeze thaw cycle makes timing important, proper conditions help prevent cracking later.
5. How do I maintain my concrete slab patio over time?
Routine maintenance includes sweeping debris, washing with mild detergent, and resealing every few years. Watch for cracks, chips, or shifting sections and address them promptly. During winter, avoid using harsh de icing chemicals that can damage the surface. Keeping snow and ice cleared helps protect the slab from freeze thaw stress.
6. Is a concrete slab patio a good long-term investment?
Absolutely. Concrete patios require less maintenance than wood decks or pavers, last for decades, and add usable living space to your yard. With the right concrete slab thickness for patio installations and proper care, your investment remains strong and attractive for many years.